Custom Guitar Build
Independent music stores? Remember those? These days, they sometimes go by “Mom & Pop” stores. Basically something that’s not a “big box” outlet for musical instruments. I can think of at least 10 of my guitar purchases from shops like that. The good old days.

One of the great things about going in to a store is that you get to lay hands on the inventory. You know what you’re getting. A guy can’t swing a womprat these days without a horror story about an online purchase. HaHa! And there’s a whole soapbox about how Internet purchases prop up confirmation bias. But that’s for another time. LOL!
Anyhoo… it was at such a Mom & Pop store that this journey begins. We can be nice and just say it was about 30 years ago. HaHa! I am in this store enough to be a fixture. It’s the same store as the classic Dimebag Darrell Randall amp clinic. Yes, I am in the video. One day, the store manager walks over with a question. What materials would I look want if I could spec out my own guitar?
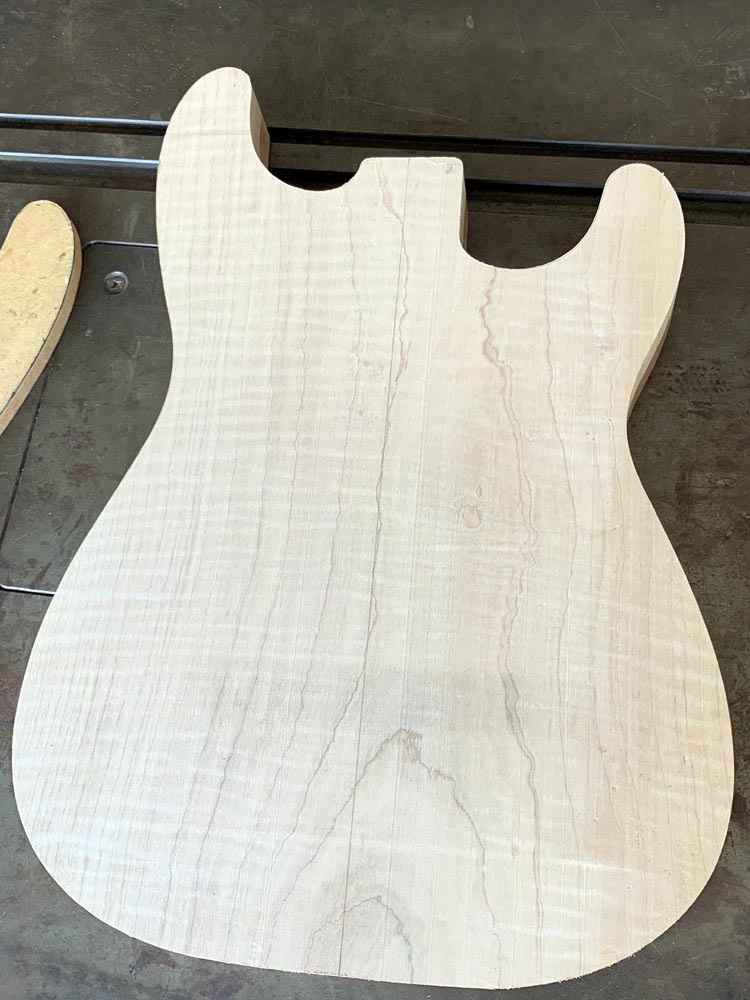
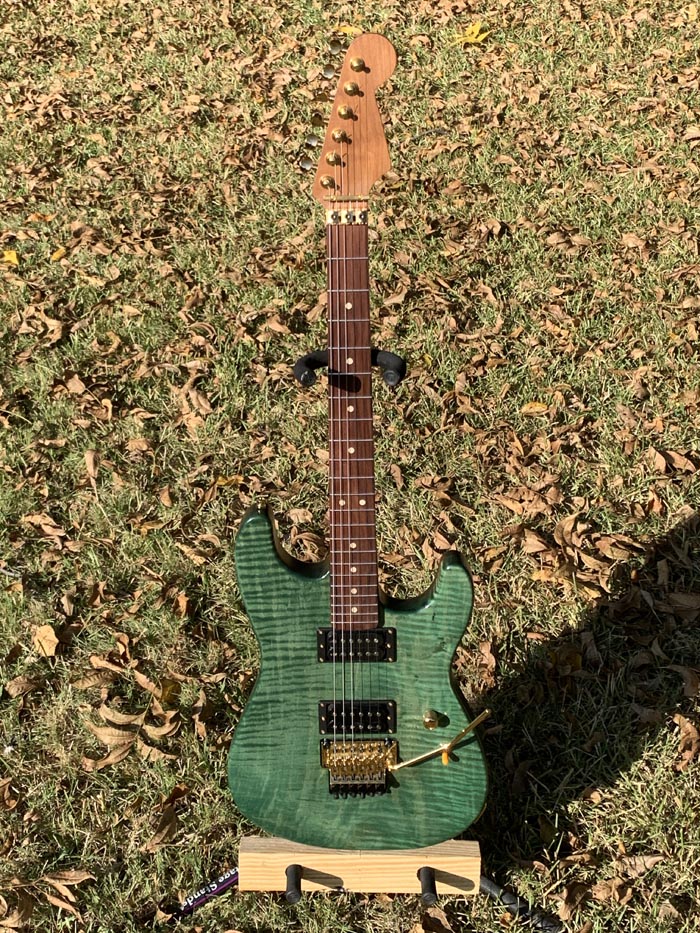
Even as a young pup, I’m already knowing I want a mahogany back with a maple top in a Strat shape. You can see that configuration all over the place these days. The maple top might be a veneer or maybe 1/16″. It’s practically ornamental at that point. A 1/8″ maple top is a little more common in some of the quality builds out there. For some reason, a thicker top is the order of the day for my preference. At least in my mind. HaHa!
And then about 5-6 years ago, I started to dabble in guitar construction. We are talking about starting with lumber and using shop tools. There are many lessons to be learned from that. I also assembled pre-made parts from Warmoth, which can be equally rewarding on it’s own merit. The standard Warmoth tops are 1/8″, so that is not an option for my parameters on this project.

A random visit to the local Woodcraft paid off. There’s a plank of maple that about 1″ think and wide enough for a Strat style body. Later on, I find some mahogany. It is as thick as I am wanting and wide enough for a 2-piece back. The maple has some flame to it. I honestly don’t care. Plain garden-variety vanilla-looking maple will be fine. I’m chasing the tone more than the appearance at this point. This is all in the Fall of 2019, so I sit on the wood until this next Summer.

It’s July 2020 when the basic dimensioning and assembly of the body starts. That is pretty much planing the wood, then gluing it altogether. Once set, the basic strat-shape outline is cut.
1-pc flame maple top 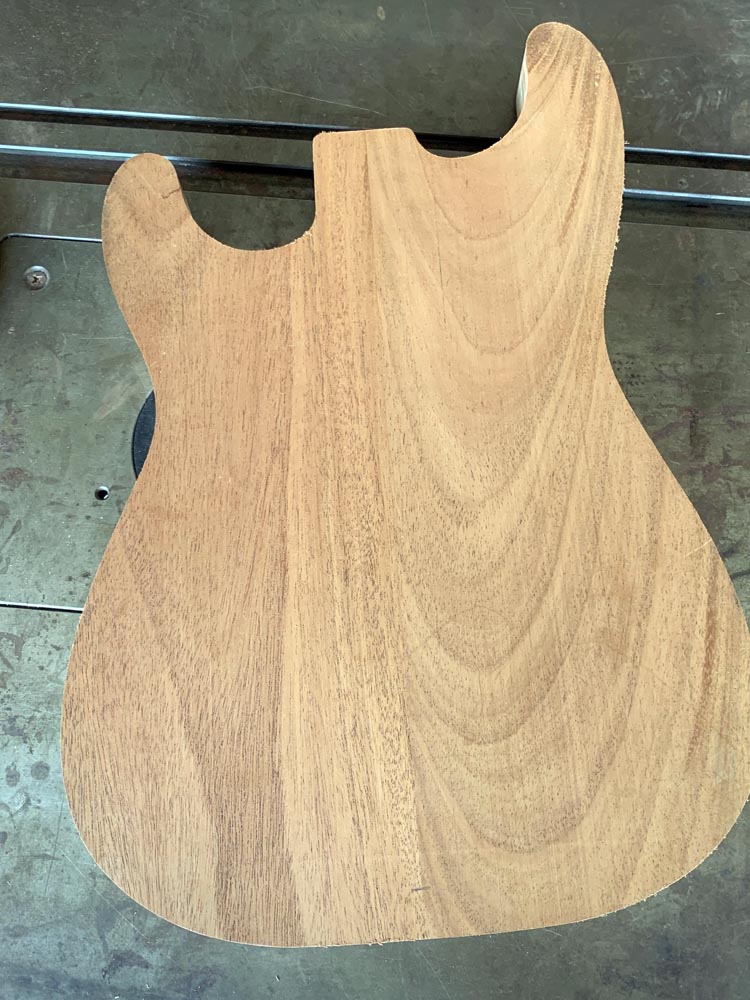
2-pc mahogany back
Making a neck is a mountain that I am not up to climbing. LOL! So I find one from Warmoth. This one is a roasted maple neck with a pau ferro finger board. I spec it for a R3 Floyd Rose locking nut and stainless steel frets.
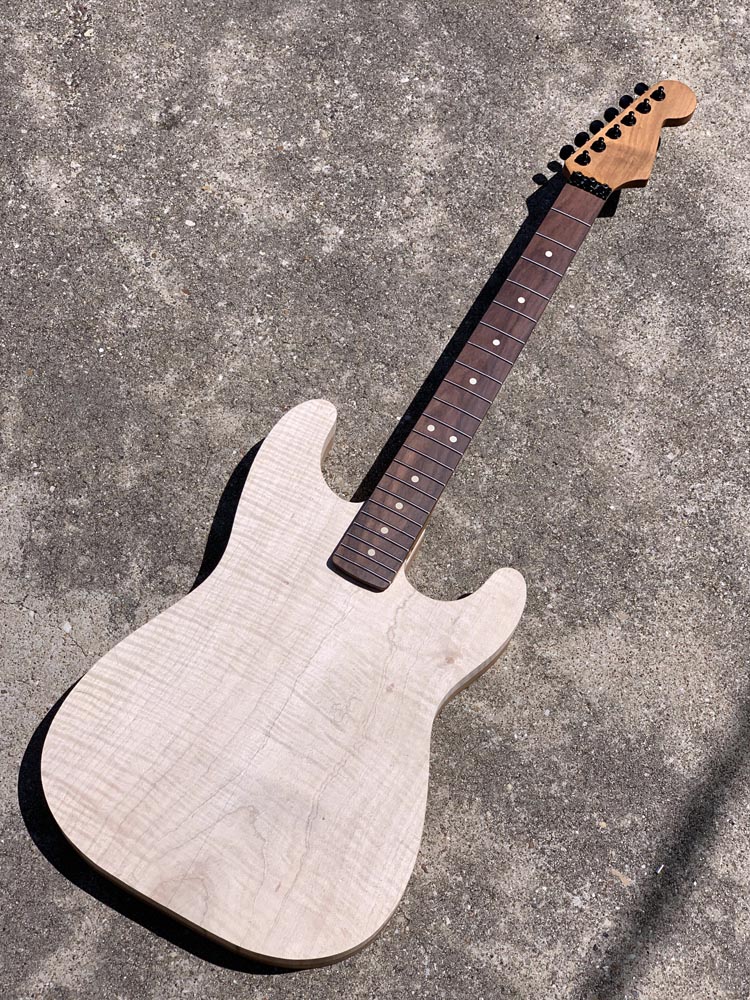
Neck test fit – front 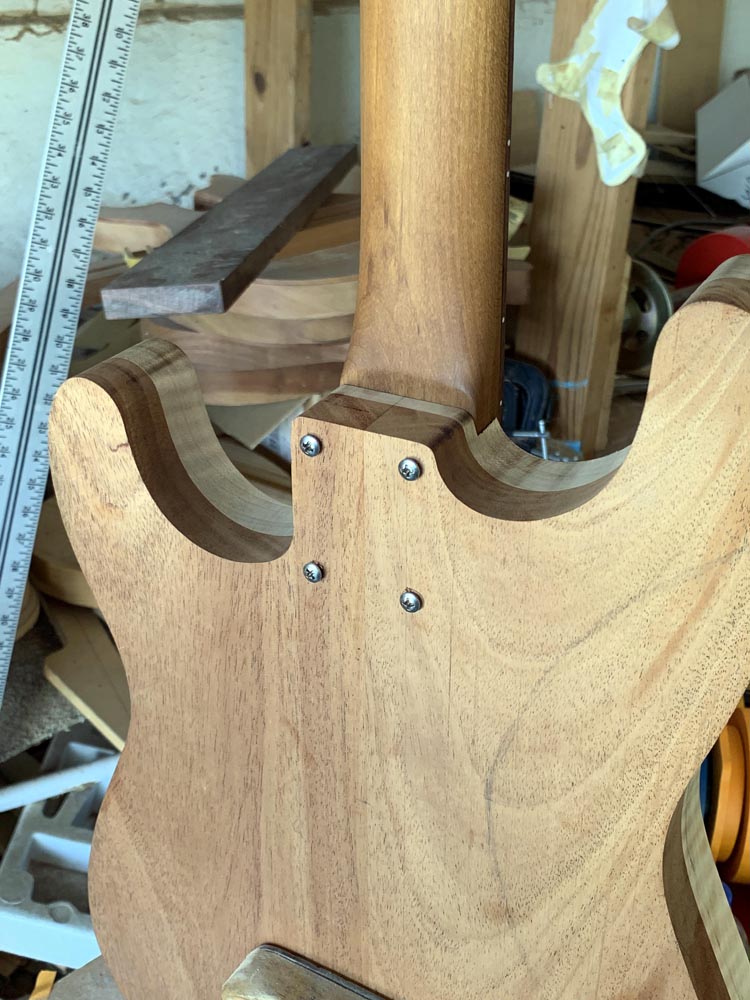
Neck test fit – rear
To break it up a little, I send the body out to a shop to get the cavities routed by CNC.
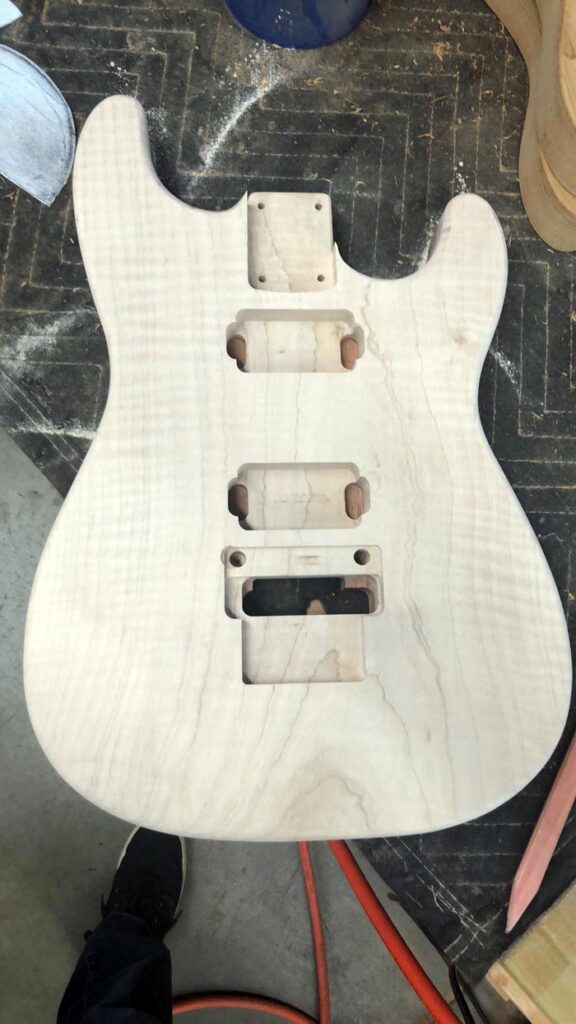
Pickup and tremolo routes 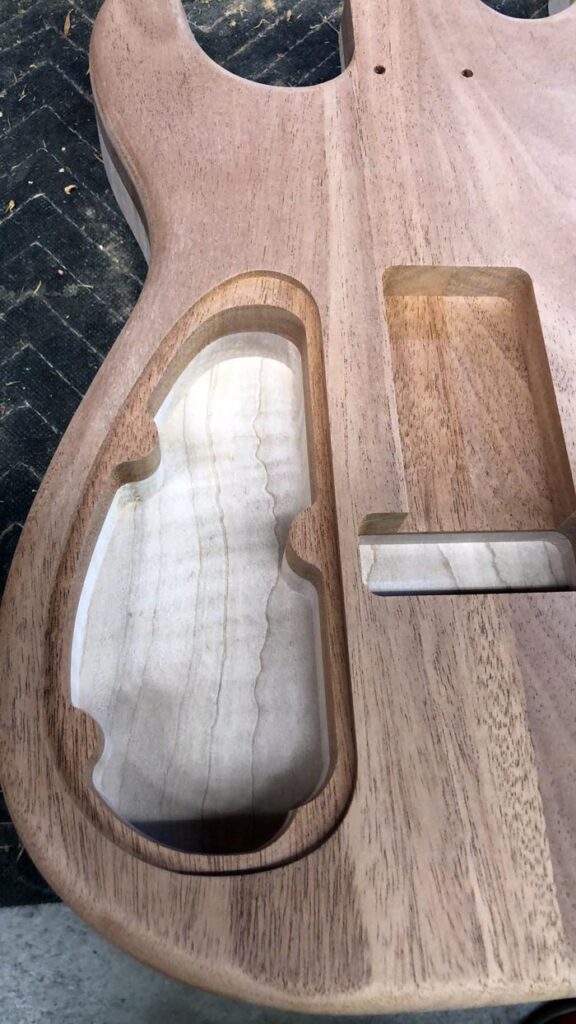
Control and spring cavity routes.
The neck plate is also routed for a recess. Why? Looks like a fun thing to try. LOL!
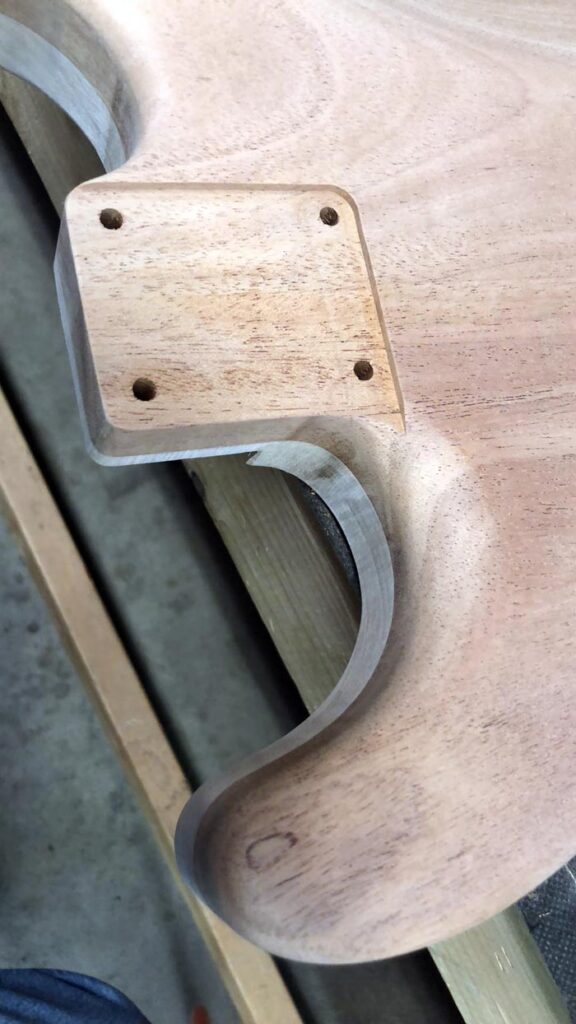
Recess neck plate route 
Recess neck plate in place
What good would it be to send it off for CNC work without having at least a little video:
Once back from the CNC shop, the body itself weighs in at about 4 lbs and 10 oz.
This is where we are in uncharted territory and the big fun starts. Why so? This is the first stab at a finish. A few years back, I essentially just went with sealer on a 2 piece alder body. That is not going to float for this build. LOL! However, I do not have nor have access to a proper paint booth.
So I tint the wood. LOL! This one is going to be green, as it’s a color I don’t already have. Prior to that, I gingerly apply some water to the body to get the grain on end. After drying, it’s given a quick light sanding. Why? Quite the manhandling has been going on during the process up until now. I want the grain to be open and ready to take the tint. This applies a little more to the mahogany in this instance.
As being new to the process, the tint can be as easy as it is challenging. As with every step of a project like this, patience is key. The end result works out fine, although not what quite in mind. Being flexible is also a key in a project like this. HaHa! An important choice for this step is to go with denatured alcohol as the delivery system. Some might use water, but I’m not wanting to swell the wood. The denatured alcohol obviously flashes off the surface and out of the grain much, much faster.
But first, a few photos of the test fitting prior to any finishing work:
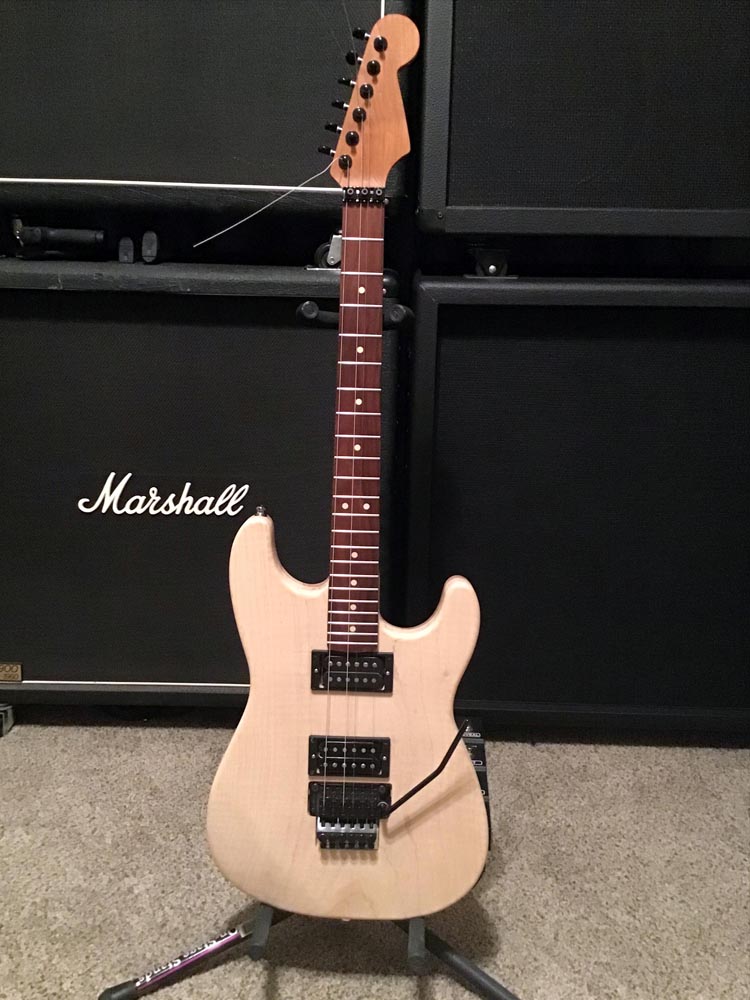
Pre-tint test-fit front 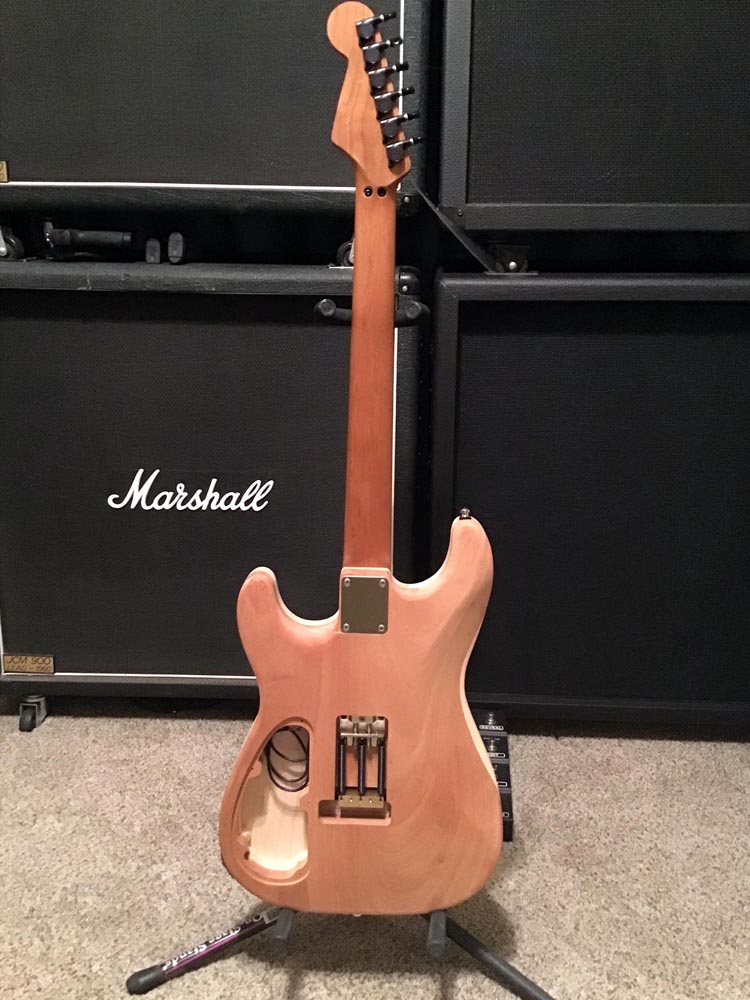
Pre-tint test-fit rear
Yes, that is NOT gold hardware. LOL! That’s what is on-hand while parts are on-order.
Once the tint is complete, I give it a few coats of sealer. This is the same type of wipe-on sealer as that neck project from a few months back. Essentially wipe or brush it on, then wipe off the excess. I am also cheating the sealer as a bit of grain fill on the mahogany back. The option for a vinyl sealer aerosol was on deck, but the elements (i.e., weather) were working against me. The wipe-on option lets me stay inside and within a more controlled environment.
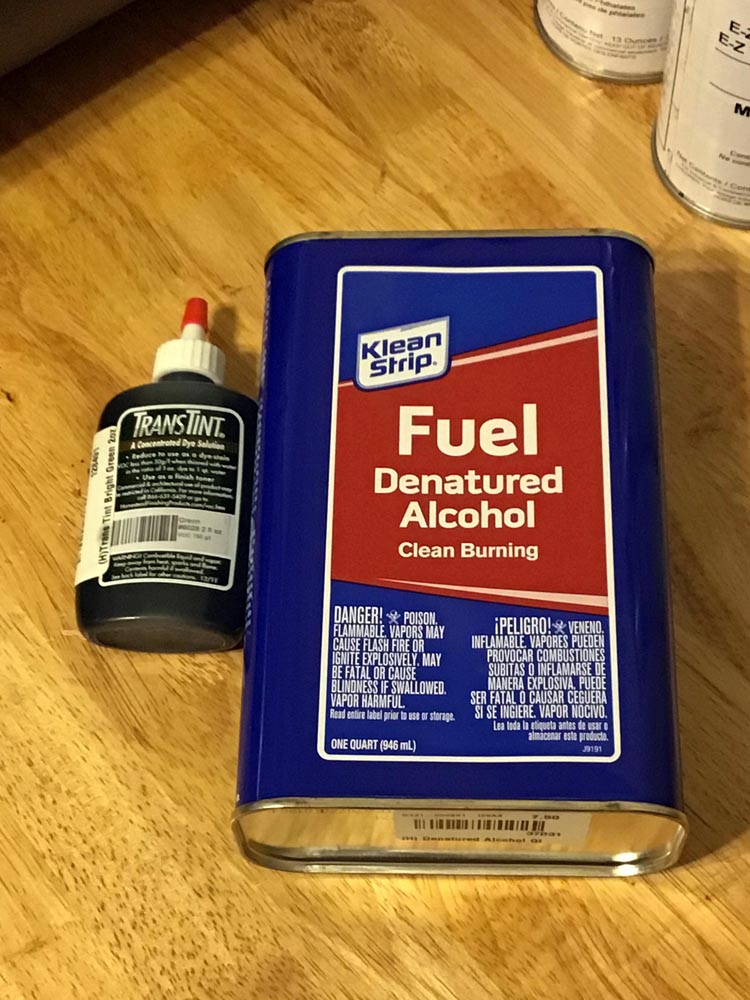
Bright Green TransTint and Denatured Alcohol 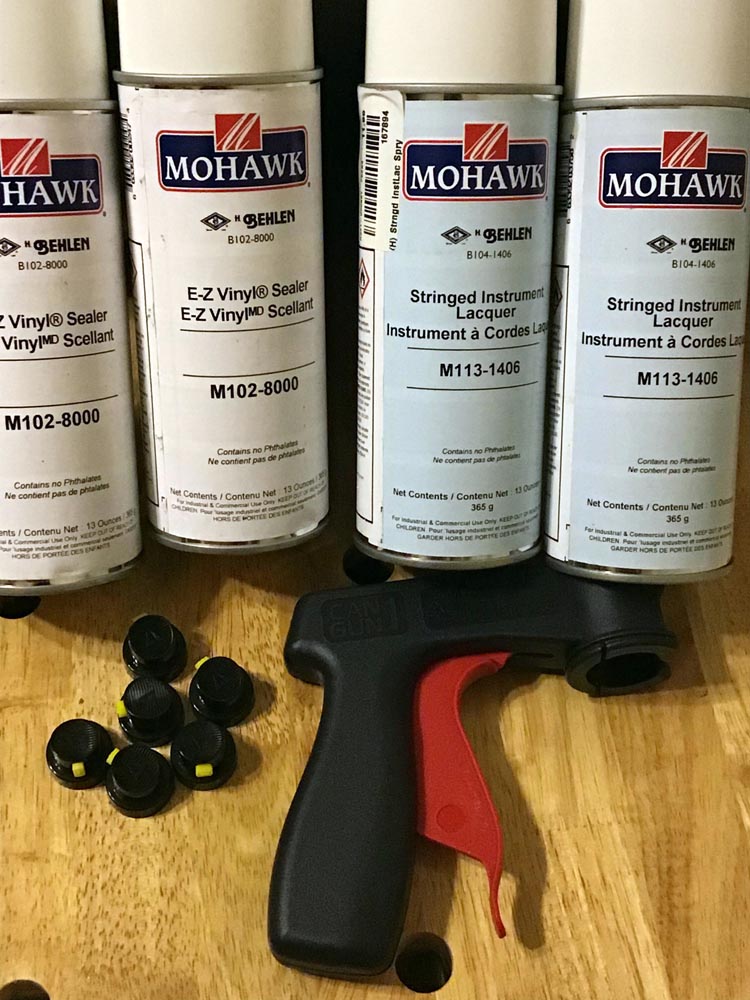
Nitro Lacquer Clear and Stew Mac nozzles
I’m choosing a nitro lacquer for the clear. The decision is that it can be a little more forgiving for the parameters that are in play. For better or worse, I do go with fairly light coats for each application. This is where the grain does start to visually pop a little.
Now the nitro needs to cure for about a month. Along the way, the clear is hard enough to knock out the holes for the controls and for the pickup mounting rings. This is also a good time to apply a few coats of conductive shielding paint in the cavities.
Buffing the nitro is a no-man’s-land for me. The last thing I want is to burn through the clear and have to re-shoot and wait another month to cure. Or worse. Go through to the wood. That means that I’m not looking at a showroom finish. LOL! Sure I can find someone with a buffer and some experience. And I bet it would take it to the next level. A mirror shine is not a big deal for me on this project. Once at a stopping point that I can live with, it gets some compound and polish.
All the hardware and assorted greeblies arrive during this time. I even source some gold screws from Mojotone. These are good for pickup adjustment and mounting, control cavity cover, and so on.
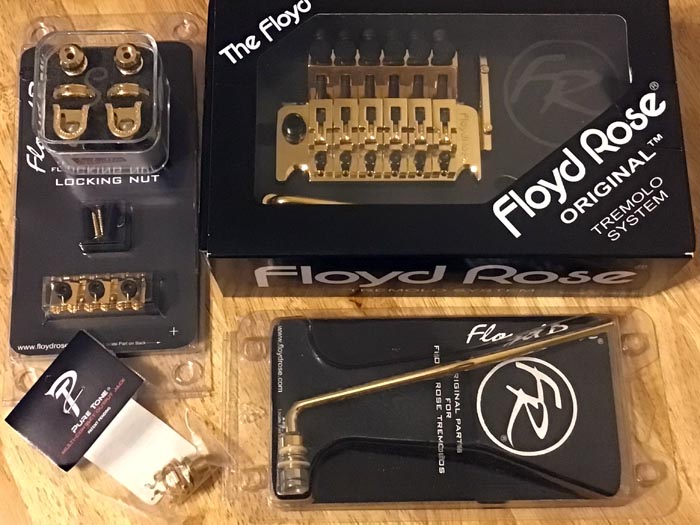
Floyd Rose, Schaller S-Locks, Pure Tone 1/4″ jack 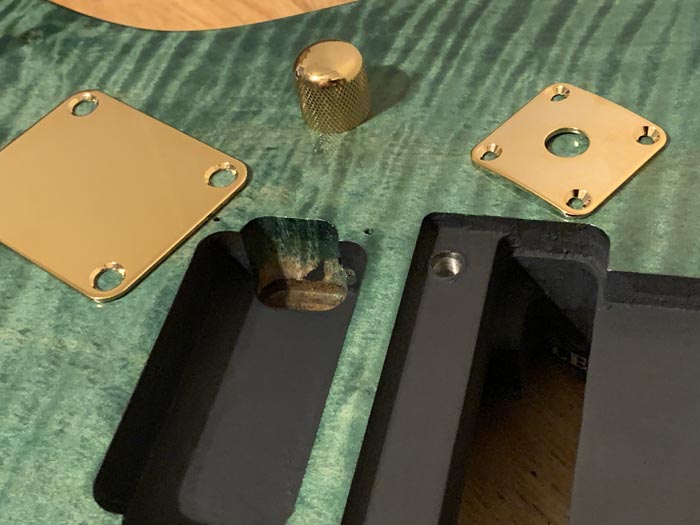
Neck plate, jack plate, volume knob
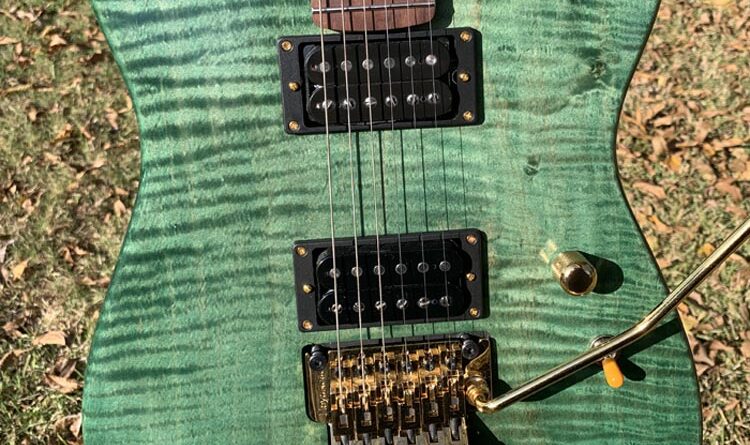
Final assembly is a snap. I’m using the Schaller Sure Claw, which makes the Floyd Rose setup very quick. I have gold hardware of this one! It definitely sets it apart and I like the vibe. It is complete with Schaller S-Lock strap locks and a Pure Tone multi-contact 1/4″ output jack. Those are also in gold. Then I’m using a Switchcraft 12120X 3-way toggle and a Bourns 500k volume pot.
Several sets of pickups were auditioned in this guitar. The original idea was to make this one an all-out sonic earth-mover. The Mojotone 44 Magnum set is excellent for that. A few tone-centric selections were also in play. When the Mojotone Premium Historic 59 PAF humbuckers goes in, the decision is set. While the Reverb-only exclusive is complete, it is my understanding that you can expect them in the 2021 lineup from Mojotone. The Premium Historic 59 PAF set is clear as a bell in this guitar, but has plenty of grind on a dirty amp setting.
There is a feature that I thought about keeping to myself. It’s not visible and there are purposefully no photos of it. If you were to pull the neck plate, I countersunk 2 additional neck mount screws. This is different from the 6-screw neck mount plates that I have. It’s a take on something Eddie did, or had done, in particular to his Kramers. There are variations of this I might try on future builds. Maybe.
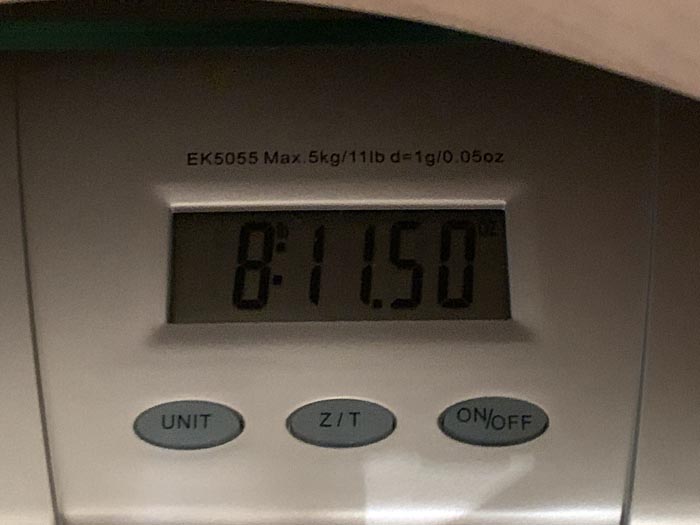
Altogether, this one clocks in at 8 lbs 11-1/2 oz. That’s within a pound of over 90% every other guitar in the herd. The body fills a SKB Strat case perfectly with no slop.
Everyone should be familiar with the character of a maple neck. I like to go with the roasted option from Warmoth. Mainly because it doesn’t need a finish and I dig the feel. Getting that extra moisture out of the wood can make it a little more stable. Tonally, there’s a little more of that maple snap. But that’s more of a feel than a huge significant difference. This is the first pau ferro I’ve tried. It also does not require a finish. The dense grain feels a little more like ebony or maple, while not being quite as bright as either. Really smooth feel to the pau ferro, which really compliments the stainless steels frets.
The overall tone is balanced and loud. Just playing it acoustically, it projects across the room. Hit a sustained chord and you can feel the mechanical resonance from the end of the body to the tip of the neck. Why is that?
I think there are a few reasons that can translate to even mass-produced instruments. Obviously, the neck has absolutely no finish on it. The pickup and control cavities have minimal sealer and no nitro lacquer clear. In other words, the entire guitar is not choked off by a hard candy shell coating. LOL! That goes double for the neck pocket. Absolutely nothing in there.
The extra neck mount screws help too, in my opinion. That approach is on a few of my guitars and I find that it has merit. Sure, it helps to keep the neck more stable and secure. I also think it keeps those wood planes super tight against each other for every ounce of energy transference. In the same way, there are also 50% more screws going through those woods for the same benefit.
It’s all the small things that add up. That’s also the same logic behind why I keep adding the Sure Claw to my projects.
As with prior projects, there’s always something new to learn. There are lessons to apply to future attempts, but the end result of this one is definitely amazing. I’d change a thing or two if I did it again, but I’d not change how it is now.
Making these projects is super helpful for knowing what to look for when buying a finished product. That knowledge is worth the effort. The takeaway to offer you guys (and gals) is to make an effort to build your own from the ground up. There are some shops out there like Texas Toast Guitars that are known to offer building classes. Find a place like that. Or maybe a small builder in your area that might take on an apprentice. Your compensation can be experience, knowledge, and slipping in your project here and there.
For reference, testing of the Custom Guitar Build is conducted with a Fractal Axe-Fx II XL+ featuring Celestion Impluse Responses and Fractal MFC-101 MIDI Foot Controller. Real cabs in use are Marshall 1960B, Mojotone British, and Peavey 6505 cabs loaded with Celestion Classic Series Vintage 30s and Classic Series G12M Greenbacks.
There are brands that I trust and prefer to use. Products purchased from these companies are a part of the making, assembly, setup, and testing of this project. You’ll see them in the links below (in alphabetical order). Definitely let them know I am sending you their way when you do business with them.
AP International Website | Facebook | Twitter
Celestion Website | Facebook | Twitter | YouTube | Instagram
Floyd Rose Website | Facebook | Twitter | YouTube
Fractal Audio Systems Website | Facebook | Twitter | YouTube | Instagram
Mojotone Website | Facebook | Twitter | YouTube | Instagram
Neck Check Guitar Luthier Supplies Website | Facebook | Twitter
Warmoth Website | Facebook | Twitter | YouTube | Instagram
7 string 59 Alnico 2 Alnico 3 Alnico 4 Alnico 5 Alnico 8 Bare Knuckle BKP Brown Sound Celestion Ceramic Custom Shop Dean DiMarzio DMT Dual Resonance EVH Fishman Floyd Rose Fluence Gibson Humbucker Ibanez JB Jimmy Page John Petrucci MJ Mojotone P90 PAF Pariah Pickup Professor Guitarism Satch Satriani Schaller Seymour Duncan Singlecoil Single Width Speaker Steve Vai Tech Tip Tremolo Virtual Vintage